Guide to making your own Easter Door Wreath
Easter is just around the corner, and it is the perfect excuse to practice your floristry craft skills to celebrate this special time of year. An Easter Door Wreath is easy and fun to make at home, adding your own stylish design touches to it. You will be hopping with egg-citement to show off your fabulous and bespoke door wreath, adding a gorgeous Spring feel to your own front door! Follow our easy 5 steps to DIY Easter Door Wreath:
What you need:
- Floral Foam Oasis wreath base
- Floral tape
- Wire
- Wire cutters
- Seasonal foliage and flowers such as tulips
- Easter decorations
- Ribbon in pastel shades
- A glue gun (optional)
If you need to buy some floristry supplies or essential tools for your flower hobby, check out our huge range of floristry supplies online. Available to order for nationwide delivery, you can easily order online and have your floristry supplies delivered direct to your door!
DIY Easter Door Wreath Guide
Step 1 Prepare the base
Using floral foam Oasis in a circular shape is perfect for this door wreath design. Before starting, soak your floral foam wreath in water for 10 minutes to allow it to absorb up the moisture. If you plan to hang the wreath on your front door ensure there is a way to hang your wreath when finished – either by attaching a loop of wire or ribbon to the back of the wreath base.
Step 2 Cover with greenery
Cut your foliage to approximately 5-6cm in length, leaving long enough stem to be able to insert into the floral foam. Add the greenery to the wreath, ensuring the foliage overlaps and covers the Oasis floral foam underneath for even coverage. You can use ivy, moss, birch twigs, eucalyptus or any seasonal foliage you can get your hands on
Top Tip: Add foliage not only to the front of the wreath but also to the outside edge and inner edge – this helps give a fuller look and will look great from all angles.
Step 3 Flower time
Next add the flowers, ensuring even coverage round the wreath. The best tip is add the blooms at the 12,3,6 and 9 o’clock positions on the wreath first and then filling in between for a balanced and natural look. Freesias, tulips, wax flowers and garden roses are all great choices for an Easter Wreath design.
Top Tip: Floral wire can also help secure the stems in place for a wreath design, so you can use this if you wish.
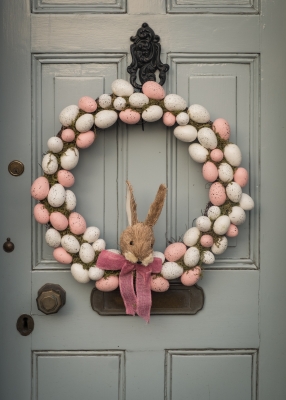
Step 4 Add Easter decorations
Now you flowers and foliage are in place, you can add any finishing decoration touches such as a giant bow, pastel ribbons, mini eggs (not the chocolate kind!), wooden bunnies or even little fairy lights. This is where a glue gun and tape can come in handy for attaching the decorations to your wreath.
Step 5 Display your door wreath
Securely hang your Easter wreath on your door and proudly admire your hard work! To keep your door wreath looking lovely for longer, give it a spritz of water every couple of days to keep the moisture level up.